– Navigate the site
– Create a New Page
– Create a New Business
– Manage Content
- Navigation
At the bottom of the website is a menu bar with links to various tools for management (see Fig. 1).
Site management is only visible when logged in.
– Navigate the site
– Create a New Page
– Create a New Business
– Manage Content
- Navigation
At the bottom of the website is a menu bar with links to various tools for management (see Fig. 1).
Site management is only visible when logged in.

- Creating a New Page
The website has been configured to allow two types of ‘content’ creation. One type is called ‘page’ content. This type allows use of a WYSIWYG editor (What-You-See-Is-What-You-Get) similar to Microsoft Word or OpenOffice Writer for text or image editing.
– To create a new ‘page’, navigate to the link at the bottom of the website titled ‘Create Page’.
– Enter a title and begin creating! Once you’re done, scroll down and click the ‘Save’ button to publish.
– The WYSIWYG editor has a built-in image uploader utility. Place your cursor where you want the image to be placed and then click on this button. (see Fig. 2) This will pop-up a small window that allows you to select an image from off of your hard disk drive. Once it finishes uploading, you’re given the option to select an image size to apply to the image.
– To edit the properties of an image, right-click on the image and select ‘Image Properties’. Alternatively, you can select the image and click on the ‘Insert/Edit Image’ button to open the same window. (see Fig. 3) This button’s purpose however is limited to editing the properties of an already uploaded image, so to upload another image, please use the ‘WYSIWYG ImageField’ button.
– The editor also has a plain-text mode for HTML source copy-pasting. This can be toggled in the ‘Input Format’ section directly beneath the editor window.


- Creating a New Business
The other content type available for creation is adding a new ‘business’ listing to the Local Businesses section of the website.
– To create a new business listing, scroll down to the site management links at the bottom of the page and click ‘Create New Business’
– Enter the name (required), address, telephone number, website address, email address, and/or any notes about the business in the fields. The business will also need to be assigned to a category.
– An image may also be attached to the business listing and will automatically resized to be displayed correctly on the Local Businesses section.
– When you’re finished, scroll down and click on the ‘Save’ button!
- Managing Content
Existing pages and business listings can be edited using the ‘Manage Content’ site management link.
– To edit or delete an existing page or business, scroll down to the bottom of the website and click the ‘Manage Content’ link in the Site Management section.
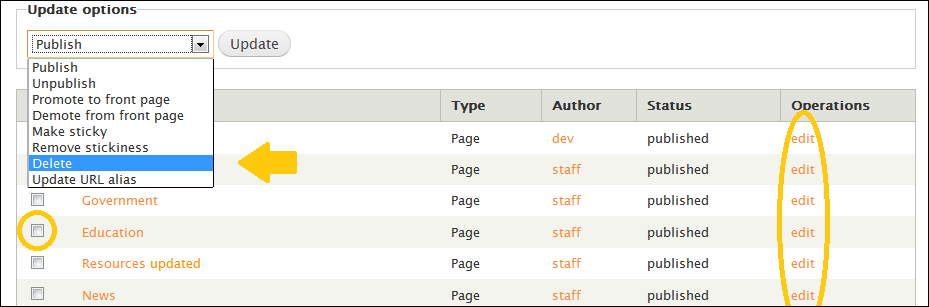
– To edit content, click on the ‘edit’ link under the ‘Operations’ column corresponding to the content to be edited. (see Fig. 4)
– To delete content, select the checkbox next to the page or business listing to be deleted. Then click on the ‘Update Options’ drop-down menu, scroll down to, and click ‘Delete’. Press the ‘Update’ button to proceed which will then prompt you to confirm the deletion. (see Fig. 4)
(Fig. 4)